Back to: ASIS PSP – Preparation Course
Objective: By the end of this lesson, you will be able to distinguish between Factory Acceptance Testing (FAT) and Site Acceptance Testing (SAT), explain the importance of a “Burn-In” period, and identify best practices for cable management and device labeling.
1. Installation Best Practices
A neat installation is usually a reliable one. The PSP exam expects you to know the difference between “shoddy work” and “professional execution.”
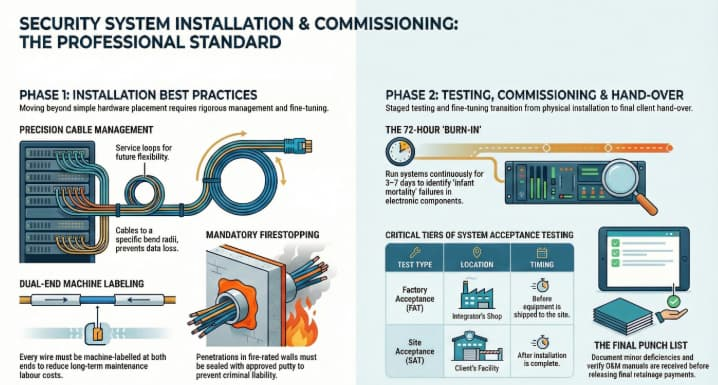
A. Cable Management
- Service Loops: Always leave a small coil of extra wire (service loop) at the device end (e.g., behind the card reader or inside the camera mount).
- Why? If the connector breaks or the device needs to be moved slightly, you don’t have to re-pull the entire cable.
- Bend Radius: Do not bend cables tighter than their rating (usually 4x the cable diameter for copper, 10-20x for fiber). Kinking the cable damages the internal structure and causes data loss (latency/packet drop).
- Support: Cables must be supported by J-hooks or trays, not laid directly on ceiling tiles (which is a code violation in many jurisdictions).
B. Labeling
- The Rule: Every wire must be labeled at both ends.
- Standard: Use a machine-generated wrap-around label (not a piece of masking tape with Sharpie).
- Value: 90% of maintenance cost is labor. If a technician spends 4 hours tracing an unlabeled wire, you are wasting money.
C. Firestopping
- Critical Safety: If you drill a hole through a fire-rated wall to run a cable, you have broken the fire barrier. You must seal it with approved firestop putty or caulk.
- Liability: If a fire spreads through your cable hole, the installer (and potentially the security manager) can be held criminally liable.
2. The Testing Hierarchy (FAT vs. SAT)
You do not just turn the system on at the end. You test in stages to save money.
A. Factory Acceptance Test (FAT)
- Where: At the Integrator’s shop/warehouse.
- When: Before the equipment ships to the site.
- Activity: The system is staged on a bench. Cameras are plugged into the server, IP addresses are assigned, and software is loaded.
- Why: It is much cheaper to fix a bad server configuration in the warehouse than it is to fix it while standing on a ladder in a busy lobby.
- Pass/Fail: If it fails FAT, it does not ship.
B. Site Acceptance Test (SAT)
- Where: At the client’s facility.
- When: After installation is complete.
- Activity: Testing the system in its real environment.
- Checks: Focus, aim, lighting interaction, network connectivity, and integration with local door hardware.
- Sign-off: The successful SAT usually triggers the “Substantial Completion” payment to the integrator.
3. Commissioning (The “Fine Tuning”)
Installation is “putting it on the wall.” Commissioning is “making it work right.”
A. Calibration
- Adjusting the sensitivity of motion sensors so the air conditioner doesn’t trigger them.
- Setting the “Masking Zones” on cameras to block out a neighbor’s window.
- Focusing lenses to meet the DORI requirement (e.g., ensuring 250 pixels/meter at the door).
B. The “Burn-In” Period
- Definition: Running the system continuously for a set period (e.g., 72 hours or 7 days) without a failure before final acceptance.
- Goal: To catch “Infant Mortality” failures. Electronic components often fail in the first 48 hours if they are defective. If they survive the burn-in, they will likely last for years.
4. The “Punch List”
As the project nears the end, the PSP walks the site with the installer and creates a Punch List.
- Definition: A list of minor deficiencies that must be corrected before the project is closed.
- Examples:
- “Camera 3 is slightly out of focus.”
- “Door 4 contacts are loose.”
- “Trash left in the server room.”
- Retainage: The client often holds back a percentage of the payment (e.g., 10%) until the Punch List is cleared.
5. Close-Out Documentation
You cannot close the project until you have the “Manuals.”
- As-Built Drawings: (discussed in 5.1).
- O&M Manuals (Operations & Maintenance):
- Manufacturer manuals for every device.
- Warranty certificates.
- Software license keys.
- Recovery disks/USBs.
Real World Tip: The “Ceiling Tile” Trick: Installers often leave trash (wire clippings, copper shards) above the drop ceiling. This is a fire hazard and lazy.
- Tip: Pop a random ceiling tile during your walk-through. If you see trash, fail the inspection immediately. It sets a tone that you are watching everything.
Real World Tip: Tell students: “Never pay the final invoice until you have the O&M Manuals and Admin Passwords.” Once the contractor gets the check, they have little motivation to find that lost software license key.