Back to: Advanced Physical Security Integration (APSI)
Module: 12 – Implementation, Codes & Closeout Prerequisites: Lesson 12.2 (Project Execution) Estimated Time: 45–60 Minutes
1. Learning Objectives
By the end of this lesson, you will be able to:
- Demonstrate the “T568B” termination standard and explain why “Split Pairs” ruin data transmission.
- Execute proper waterproofing techniques, including the “Weep Hole” rule and Gland tightening.
- Apply cable dressing standards: Bend Radius, Velcro usage, and Service Loops.
- Select the correct mounting hardware (Toggle Bolts vs. Conical Anchors) for different substrates.
2. Cabling Hygiene: The “Art” of the Rack
The back of the rack is your business card. If it looks like spaghetti, the client will assume the rest of your work is sloppy.
A. Velcro vs. Zip Ties
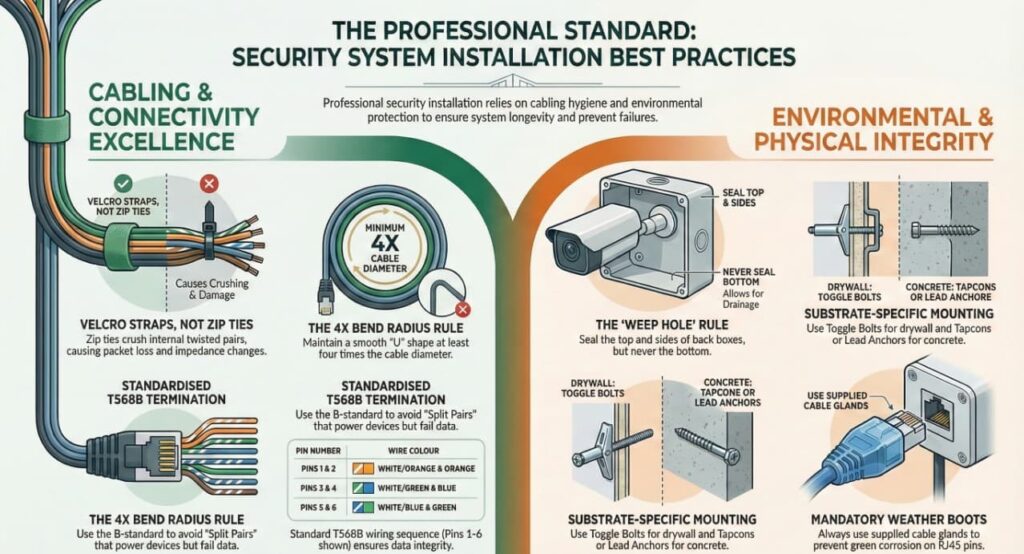
- The Rule: NEVER use Zip Ties on Cat6/Cat6A.
- The Physics: Zip ties put localized pressure on the cable jacket. Over time (or if overtightened), this crushes the internal twisted pairs. This changes the impedance and causes “Packet Loss” or “CRC Errors.”
- The Fix: Use Velcro straps. They are soft, reusable, and allow you to add cables later without cutting.
B. Bend Radius
- The Concept: Data flows through copper at high frequencies. If you bend the cable too sharply (like a folded hose), the signal reflects back.
- The Standard: Minimum Bend Radius = 4x the Cable Diameter.
- Visual Check: If the bend looks like a sharp “V,” it fails. It should look like a smooth “U.”
C. The Service Loop
- At the Device: Leave 3–5 feet of slack coiled above the ceiling tile or inside the J-Box.
- Why: If you need to re-terminate the jack 3 times, you have wire to spare.
- At the Rack: Leave 5–10 feet coiled neatly in the ladder rack or vertical manager.
- Why: If the client decides to move the rack to the other side of the room, you don’t have to re-pull the entire building.
3. Termination Standards (The Copper Connection)
The most common point of failure is the RJ45 jack.
A. T568B (The World Standard)
There are two color codes: A and B. In Commercial Security, we almost exclusively use T568B.
- Order (Left to Right, Clip Down):
- White/Orange
- Orange
- White/Green
- Blue
- White/Blue
- Green
- White/Brown
- Brown
B. The “Split Pair” Mistake
- The Error: A rookie matches the colors logically: (Orange, Orange, Blue, Blue, Green, Green…).
- The Result: The device powers up (PoE works), but No Data passes.
- Why: The “Twist” inside the cable cancels out interference. If you untwist them or mix the pairs, you get “Crosstalk.”
C. Certification vs. Verification
- Verifier ($500 Tool): “The wires are connected.” (Good for simple checks).
- Certifier ($10,000 Tool): “The cable can handle 1Gbps speed at 100 meters.” (Required for Warranty).
4. Waterproofing: Keeping the Elements Out
Water is patient. It will find a way in.
A. The Drip Loop
(Recapped from previous concepts, but vital): Always ensure the wire travels up into the device so gravity pulls water away from the seal.
B. The Cable Gland (The “Grommet”)
- The Mistake: Installers often throw away the rubber weather-tight connector that comes with the camera because “it takes too long to assemble.”
- The Result: Water travels down the Cat6, enters the RJ45 port, and shorts the pins (Green Corrosion).
- The Fix: Always use the supplied weather boot. If you can’t fit the pre-made connector through it, cut the connector off, slide the boot on, and re-crimp.
C. The “Weep Hole” Rule
- The Physics: Condensation happens. Hot days + Cold nights = Water inside the junction box.
- The Rule: Silicone sealant goes on the Top and Sides of the camera back box.
- NEVER seal the Bottom.
- Why: The bottom must remain open so that internal condensation can “weep” (drain) out. If you seal the bottom, you turn the camera into a fishbowl.
5. Device Mounting: Anchors & Substrates
Cameras are heavy. Drywall is weak.
A. Drywall (Sheetrock)
- Bad: Plastic conical anchors. (They pull out easily).
- Good:Toggle Bolts (Snap Toggles).
- How they work: They flip open behind the wall and spread the load across 2 inches of drywall.
B. Concrete / Brick
- Bad: Drilling a hole and shoving a screw in.
- Good:Tapcons (Blue Screws) or Lead Anchors.
- Tip: Use a Hammer Drill. Clean the dust out of the hole before inserting the screw, or it won’t grip.
C. ACM (Aluminum Composite Material)
- This is the shiny metal cladding on modern car dealerships/offices.
- Risk: It is hollow.
- Fix: Use Rivnuts (Riveted Nuts). They crimp onto the metal skin, providing a solid threaded hole for your machine screw.
6. Aesthetics: Hiding the “Squid”
The “Squid” or “Pigtail” is the bundle of connectors (RJ45, Audio, Alarm I/O, Power) hanging off the camera.
Option 1: The Back Box (Junction Box)
- Buy the matching manufacturer back box.
- Coil the pigtail inside the box.
- Mount the camera to the box lid.
- Result: Clean, professional, waterproof.
Option 2: The Direct Penetration
- Drill a 1-inch hole directly behind the camera mount.
- Push the entire pigtail into the wall cavity / ceiling.
- Mount the camera over the hole.
- Risk: If the wall is solid concrete, you can’t do this. You must use a back box.